support@meisterdrucke.com  ·  0043 4257 29415

Deutsch English Italiano Español Français Nederlands Português Svenska Polski Dansk
Search by artist, work title or style – e.g. Monet, Starry Night, Impressionism, Hokusai wave, nude. Describe the scene – e.g. green meadow, abstract with lots of red, dark oil painting, standing nude next to a tree.

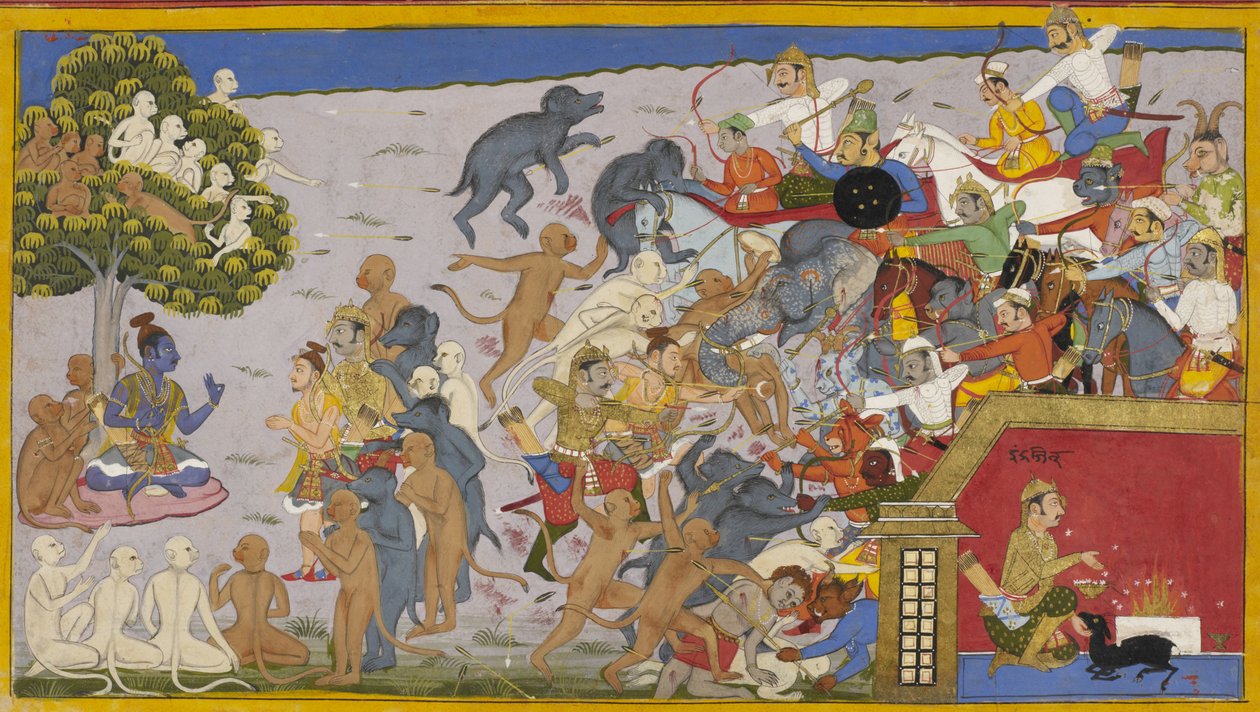
Rama Sends Lakshmana and Bibhishana

Rama Sends Lakshmana and Bibhishana's Army Against Indrajit, Who Sacrifices to Gain Invisibility

(Rama sends Lakshmana and Bibhishana's army against Indrajit, who sacrifices to gain invisibility)


Sahibdin

€ 131.4
Enthält 13.5% MwSt.
   Configure art print
1652  ·  miniature  ·  Image ID: 1632606

Nonclassified artists

Rama Sends Lakshmana and Bibhishana's Army Against Indrajit, Who Sacrifices to Gain Invisibility by Sahibdin. Available as an art print on canvas, photo paper, watercolor board, natural paper, or Japanese paper.
17th century · bow (weapon) · weapon · army · battle · colour · civilization · hinduism · religion · india · asia · miniature · mythology · mythological figure · monkey · animal · battles · soldier · armed conflicts · famous people · weapon · weapons · spear · trooper · mammal · fire · 17th century · battaille · military event · armed conflict · weaponry · combat · flames · military events · sacrifice · indrajit · lakshmana · bibishana · bibhishana · vibhishana · indrajita · rama · British Library, London, UK / Bridgeman Images
Other color versions of this image  
AR/3D   View in 3D / AR zu Favoriten hinzufügen   Add to favorites    Change wall color    View picture in a room
0 Reviews

Configure art print

Picture Frame

Medium & Stretcher

Glass & Passepartout

Miscellaneous & Extras

 Save / compare configuration
Preview Icon

Summary

Gemälde
Veredelung
Keilrahmen
Museumslizenz

€ 131.4
(inkl. 20% MwSt)
   Add to cart

Bildschärfe: PERFEKT

If you'd like us to adjust the brightness, colors, or crop the image, we're happy to do this for you at no extra cost. Just get in touch!

Similar artworks selected for you

Hanumān and Vibhīṣaṇa Bring Wounded Lakṣmaṇa to Rāma, Who Heals Him Akampana is killed by Hanuman; Rama’s council plans as demons retreat Battling the ten-headed Demon King Ravana, Lakshmana and Vibhishana wound Ravana; Lakshmana is injured and Hanuman is sent to the Himalayas Sugriva and Angada kill demon foes in battle Monkeys burn Lanka as demons flee and Rama’s allies prepare to act Kumbha and Nikumbha Battle Monkeys; Demons Report to Ravana Vajradhanstra is slain by Angada amid omens; Rama’s side rejoices Ravana wounds Lakshmana; Hanuman strikes Ravana and saves Lakshmana Indrajit Overwhelms Rama and Allies; Hanuman Sets Off to Find Healing Herbs Ravana leads his forces as Sugriva advances; Rama and allies hold in reserve Ravana Prepares for Battle; Rama Consults Vibhishana on Enemy Commanders Rama and allies attack demons as Indrajit performs an invisibility ritual Hanuman arrives with a healing herb; Lakshmana recovers and vows to defeat Ravana
Show more similar artworks

Similar artworks selected for you

Hanumān and Vibhīṣaṇa Bring Wounded Lakṣmaṇa to Rāma, Who Heals Him Akampana is killed by Hanuman; Rama’s council plans as demons retreat Battling the ten-headed Demon King Ravana, Lakshmana and Vibhishana wound Ravana; Lakshmana is injured and Hanuman is sent to the Himalayas Sugriva and Angada kill demon foes in battle Monkeys burn Lanka as demons flee and Rama’s allies prepare to act Kumbha and Nikumbha Battle Monkeys; Demons Report to Ravana Vajradhanstra is slain by Angada amid omens; Rama’s side rejoices Ravana wounds Lakshmana; Hanuman strikes Ravana and saves Lakshmana Indrajit Overwhelms Rama and Allies; Hanuman Sets Off to Find Healing Herbs Ravana leads his forces as Sugriva advances; Rama and allies hold in reserve Ravana Prepares for Battle; Rama Consults Vibhishana on Enemy Commanders Rama and allies attack demons as Indrajit performs an invisibility ritual Hanuman arrives with a healing herb; Lakshmana recovers and vows to defeat Ravana
Show more similar artworks

More art prints by Sahibdin

Vibhishana mourns Ravana; Rama orders funeral rites and Vibhishana Rama Sends Lakshmana and Bibhishana Rama Kills Ravana with the Brahma Weapon; Celestials Rejoice and Vibhishana Pays Homage Rama Is Crowned and Rewards His Allies; Sita Gifts Her Necklace to Hanuman Indrajit Injures Rama and Lakshmana; Monkeys Despair but Vibhishana Consoles Them Rama Shows Sita Their Past; Monkeys at Kishkindha Join Their Journey Home Rama and Sita Arrive at Bharadvaja Ravana Readies for Battle in Golden Armour, Saluted by Attendants Bibhishana Lights Ravana Rama and Allies Attack as Angada Assaults Indrajit Rama and Ravana Rama and Ravana Fiercely Battle as Omens Foretell Ravana The Siege of Lanka, c.1653 Lakshmana Kills Indrajit; Rama and Allies Await Monkeys and Demons Battle in Nikumbhila Grove, with Indrajit
Show more works by Sahibdin

More art prints by Sahibdin

Vibhishana mourns Ravana; Rama orders funeral rites and Vibhishana Rama Sends Lakshmana and Bibhishana Rama Kills Ravana with the Brahma Weapon; Celestials Rejoice and Vibhishana Pays Homage Rama Is Crowned and Rewards His Allies; Sita Gifts Her Necklace to Hanuman Indrajit Injures Rama and Lakshmana; Monkeys Despair but Vibhishana Consoles Them Rama Shows Sita Their Past; Monkeys at Kishkindha Join Their Journey Home Rama and Sita Arrive at Bharadvaja Ravana Readies for Battle in Golden Armour, Saluted by Attendants Bibhishana Lights Ravana Rama and Allies Attack as Angada Assaults Indrajit Rama and Ravana Rama and Ravana Fiercely Battle as Omens Foretell Ravana The Siege of Lanka, c.1653 Lakshmana Kills Indrajit; Rama and Allies Await Monkeys and Demons Battle in Nikumbhila Grove, with Indrajit
Show more works by Sahibdin

A selection of our top sellers

Standing half-nude with brown shirt In the Shadow of an Italian Pergola, A Warm Afternoon in Anacapri Carnation, Lily, Lily, Rose The Youth of Bacchus, 1884. Sunflowers Breakfast under the big birch Cypress Road under the Starry Sky Several Circles, 1926 Wheatfield with Crows Wiltshire Landscape, 1937 The Alexander Mosaic, depicting the Battle of Issus between Alexander the Great (356-323 BC) and Darius III (d. 330 BC) in 333 BC, Roman floor mosaic from the Casa del Fauno (House of the Faun) The Resurrection of Christ, from the right wing of the Isenheim Altarpiece, c.1512-16, detail of 17677 Landscapes, Flowers and Birds: Plum, Qing Dynasty, 1780 “Remember”, “His Country” series, 1924 The Plague Is Coming
Show more artworks

A selection of our top sellers

Standing half-nude with brown shirt In the Shadow of an Italian Pergola, A Warm Afternoon in Anacapri Carnation, Lily, Lily, Rose The Youth of Bacchus, 1884. Sunflowers Breakfast under the big birch Cypress Road under the Starry Sky Several Circles, 1926 Wheatfield with Crows Wiltshire Landscape, 1937 The Alexander Mosaic, depicting the Battle of Issus between Alexander the Great (356-323 BC) and Darius III (d. 330 BC) in 333 BC, Roman floor mosaic from the Casa del Fauno (House of the Faun) The Resurrection of Christ, from the right wing of the Isenheim Altarpiece, c.1512-16, detail of 17677 Landscapes, Flowers and Birds: Plum, Qing Dynasty, 1780 “Remember”, “His Country” series, 1924 The Plague Is Coming
Show more artworks


What our customers think about us


Frequently Asked Questions about Meisterdrucke


Personalizing your art print at Meisterdrucke is simple and intuitive: Choose a frame, set the image size, pick a printing medium, and add suitable glazing or a stretcher frame. We also offer additional customization options like mats, fillets, and spacers. If you have any questions, our customer service team is ready to help you create your perfect artwork.

At Meisterdrucke, you can visualize your configured artwork directly in your own room. Simply upload a photo of your space and see how the artwork looks in it. If you're visiting us on a mobile device — phone or tablet — our augmented reality feature brings the picture to life and projects it right into your room. A unique experience that combines art and technology.

Choosing the right medium is often a matter of personal taste. To give you a better idea, we've provided some images for each medium. We also offer a sample set of all paper variants, so you can decide not just visually but by touch as well. You can order the sample set free of charge — only shipping costs apply.

Don't worry! At Meisterdrucke, we don't just process orders mechanically. Every order is manually reviewed by our team. If we spot any inconsistencies or issues with your configuration, we'll get in touch with you right away. And of course, our friendly and patient support team is always here to help you with your configuration. We'll work with you by phone or email to adjust your image so the final result is exactly what you had in mind.


Still have questions?

Are you interested in an art print from our manufactory but still unsure? Do you need advice on choosing the medium or help with the order?

Our experts are happy to assist you.

+43 4257 29415
support@meisterdrucke.com
Mo-Do: 7:00 - 16:00 | Fr: 7:00 - 13:00

Still have questions?

Are you interested in an art print from our manufactory but still unsure? Do you need advice on choosing the medium or help with the order?

Our experts are happy to assist you.

+43 4257 29415
support@meisterdrucke.com
Mo-Do: 7:00 - 16:00 | Fr: 7:00 - 13:00


Meisterdrucke

   Kärntner Strasse 46
        9586 Finkenstein am Faaker See
        Austria
        +43 4257 29415
        support@meisterdrucke.com
Other languages

                   
Erfahrungen & Bewertungen zu Meisterdrucke
Post.at DHL Express Quehenberger Cargoboard
Kaiser Franz Joseph

Meisterdrucke
Kärntner Strasse 46
9586 Finkenstein am Faaker See · Austria
+43 4257 29415 · support@meisterdrucke.com
Post.at DHL Express Quehenberger Cargoboard


(c) 2026 meisterdrucke.ie